A Practical Guide to Constructing Tubes on Foreign Planets
Priorities
The first piece of code we worked on for Terminus was what we considered to be the most difficult part: the tube network.
Determining the technical requirements, the limitations and then the implementation of the tube pathfinding, construction and integration with buildings took up a considerable amount of prep time for Terminus. Once we actually had the tubes working – efficiently at that! – we felt much more confident about the other elements such as 3d models, sound effects and logical code, all of which has been done before in one form or another or are otherwise not technically complex or difficult.
The first thing we had to get working was the pathfinding system, after all how do we know where the tube is even supposed to go in 3d space? We briefly considered a fixed-size tube component, similar to how tubes were built in the original Outpost or how roads work in Alpha Centauri, and while this likely would have worked fairly well for a game with limited terrain height differences we wanted a more natural look to our planet terrain and so we put in the time to implement a more complex feature.
A* Pathfinding
We used the popular A* Pathfinding technique to implement a node-based, grid-graph, seeker/target system. Below is a visual representation of one of the grid graphs taken from Terminus terrain. The different coloured areas represent distinct networks inaccessible from any other network (note the void between networks). What this means practically is that a tube will not be able to pathfind its way from one of these network areas to the other, the void-space between will prevent a legal path from being produced and therefor not allow a tube to be constructed. The distinction between valid node and void is one of steepness of angle.
(click to enlarge)

When a tube-construction-request begins by clicking on one of the airlocks of a building, we immediately begin checking the mouse position (ray-casted to hit whatever part of the terrain/grid-graph is underneath it so we have a 3d reference in game space) and comparing it to the start position of the tube (the airlock in this case). Every frame update of the game engine we then run the A* Seeker Pathfinder to hunt out a legal path from our start (airlock) to our end (raycasted mouse position). If the pathfinder finds a legal path across the grid graph then we construct the tube.
(below: cross section of the green pathfinding line and the tube constructed overtop of it)

Tube Construction
The tube itself is procedurally generated and creates a new, complete, low-polygon mesh and procedurally textures it at least once per frame which ensures the player will always see an accurate representation of the tube position. Step by step the tube construction follows this process:
- Acquire the array of Vector3 positions detailing the legal route produced by the A* Pathfinding seeker (Vector3s represent X,Y and Z coordinates which give us unique locations in our 3d space)
- Deploy a 4-vertex, 2-dimensional square to every Vector3 coordinate given to us by the Pathfinder. (Each Vector3 corresponds precisely to the location of one of the aforementioned nodes in the grid graph)
- Record the positions of each vertex in the square as it travels along the Pathfinding locations until it has reached its destination.
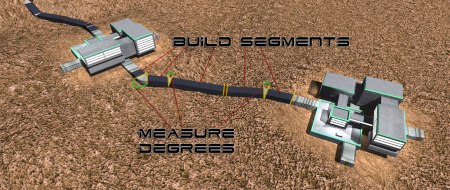
- (while doing 3) determine if the angle difference between any two coordinates in the pathfinding locations is significant enough that we need to perform a ‘turn’. If we do need to perform a turn, then the 4-vertex slice cuts a corner, adding many more vertex coordinates from our array from point #3.
- Take the complete array of vertex positions given to us by our 4-vertex slice, then construct triangles between each vertex systematically until the entire tube has vertices and triangles (giving us shape and surface).
- Apply our texture across each segment of completed tube mesh, using a different texture for the ‘turn’ parts of the tube mesh which are textured to look like flexible ‘accordion’ connections often seen on busses or at airplane loading gates.
- Destroy the tube and rebuild if the mouse position moves.
- Repeat at least once per frame until the player clicks to place the tube.

There, I bet you never thought a little tube could be so complex eh?

September 25, 2013 at 11:28 pm
looks interesting. Will a hull breach only be occurring in the buildings or also in the tubes?
September 26, 2013 at 12:53 am
The tubes operate the same way as buildings in a lot of respect, chiefly that something like a fire has to ‘attack’ into them from an adjacent building just like a fire attacks from one building another adjacent one. The design calls for tubes to be ‘on fire’ so, they could theoretically burn down before they transmit the fire to a nearby fire-free building. I don’t see why the tubes can’t also breach and become open to space, that will just have to come down to playtesting to see if it satisfies the gameplay mechanics we need re: the fire spreading mechanics.
September 26, 2013 at 7:58 am
I’m curious how long this whole system took you to implement. Looks like you’ve done a lot, from making a set of reachablility zones to implementing A* to a bunch of mesh generation stuff.
September 26, 2013 at 8:06 am
About four, five, or perhaps six weekends of work I think, it was a while ago that we actually put it in and got everything working. The subject matter is complex, yes, and fairly interesting to implement and put all the pieces in place but it’s not anything novel in the game industry, just our own little approach to this problem of the tubes!